Applications of Integration
Overview
This note extends integration from symbolic technique into geometry and application.
The key shift is:
- in the main integration hub, the definite integral is understood as signed accumulation
- here, that accumulated quantity is interpreted as area, volume, or another geometric quantity
So the main challenge in application questions is often not integration itself. It is choosing the correct:
- graph description
- interval
- upper and lower function
- axis of rotation
That is why application questions often feel different from technique questions: the bottleneck is usually interpretation, not anti-differentiation.
Area Under a Curve
If lies above the -axis on , then the area under the curve is
This works because the signed accumulation is positive throughout the interval.
But the formula only works directly as geometric area when the curve does not cross below the axis on that interval.
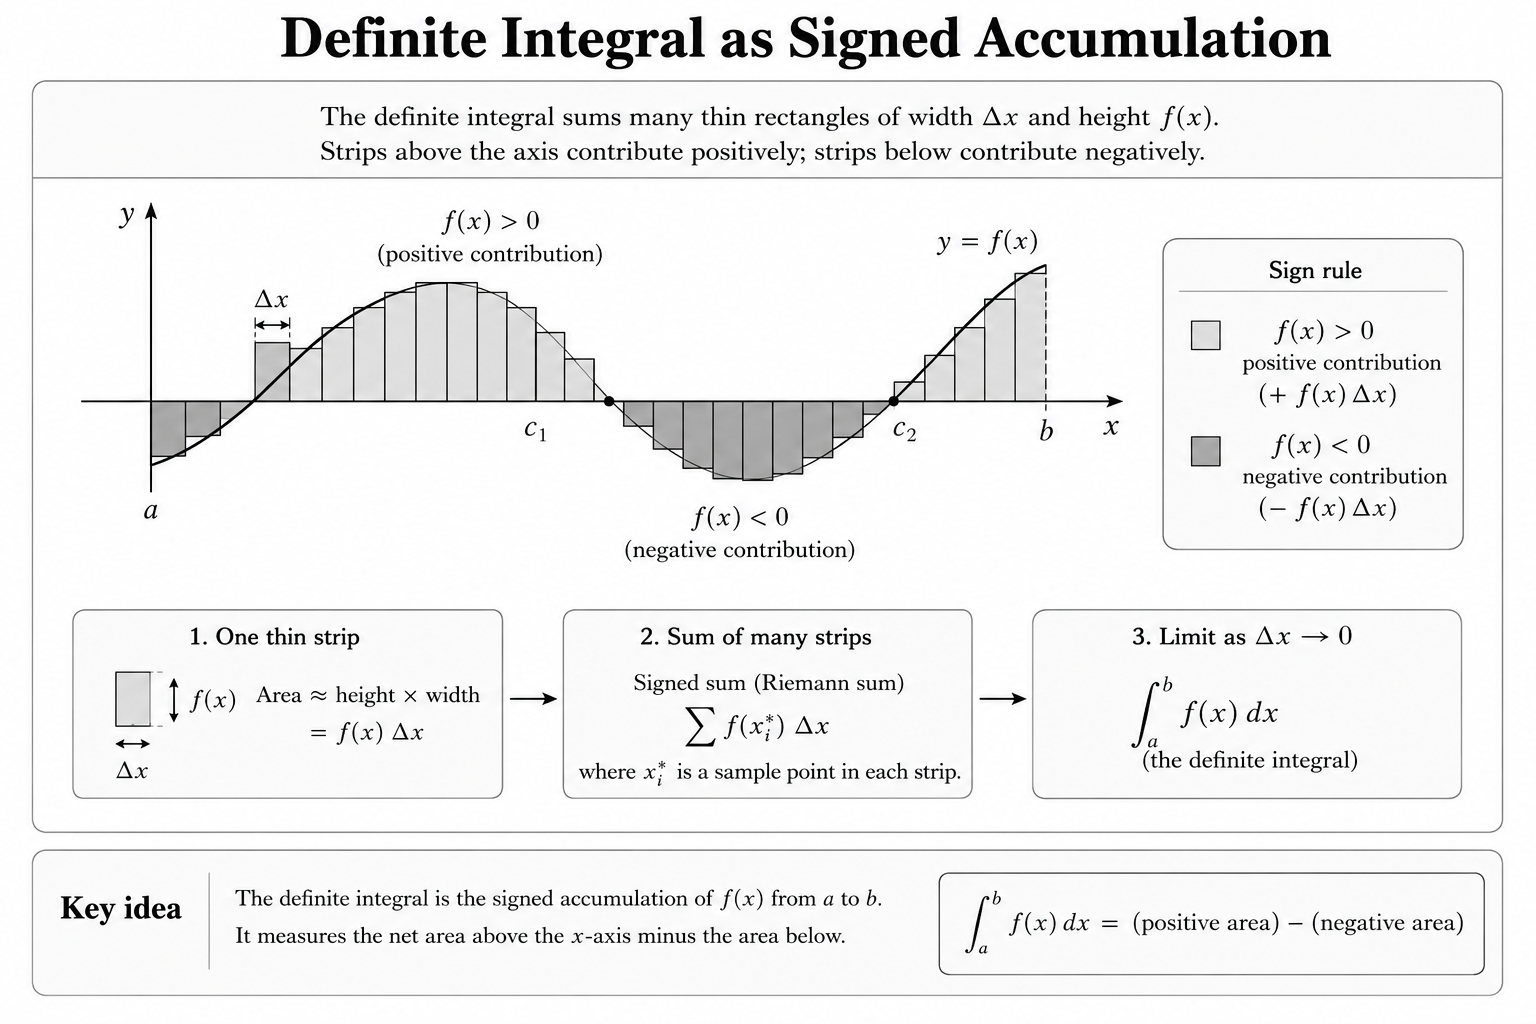 Caption: A definite integral is the limit of signed rectangular contributions; rectangles below the -axis contribute negatively.
Why sketching matters
The method repeatedly uses sketches because area questions are graph questions before they are integration questions.
A sketch helps you see:
- where the curve crosses the axis
- whether the region must be split
- whether the upper boundary is given as in terms of , or vice versa
So the graph is not optional decoration. It is often what determines the correct integral.
In many questions, the correct sketch effectively decides:
- how many integrals are needed
- which function is being subtracted from which
- whether the variable of integration should stay as
Signed Area Versus Geometric Area
If a curve crosses the -axis, then
gives the net signed area, not the total geometric area.
To find geometric area, split the interval at the intercepts and make each contribution positive.
This is one of the most common conceptual mistakes in calculus:
- definite integral: signed accumulation
- geometric area: always non-negative
Area Between Curves
If two curves are given by
on an interval where , then the area between them is
The real task is identifying:
- the correct intersection points
- which curve is upper and which is lower
- whether the interval must be split because the ordering changes
This is why graphing and curve-sketching knowledge matter directly here.
 Caption: Area between curves is built from thin slices whose height is upper curve minus lower curve.
Vertical versus horizontal slicing
When finding the area of a region, the first question should not be “Which formula should I use?” but rather:
How can I slice the region so that each slice has a simple length?
Most H2 questions are naturally solved using vertical slices. A vertical slice has a small width , so its area is approximately
If the upper curve is and the lower curve is , then the height of the slice is
So the area is
This is often described as
However, this is not the only possible way to slice a region.
Sometimes a region is awkward to describe using vertical slices. A vertical line may cut through the region in more than one piece, or the upper and lower boundaries may change halfway through the interval. In such cases, using vertical slices may require splitting the region into several separate integrals.
A horizontal slice may be simpler.
A horizontal slice has a small thickness . Its length is measured from the left curve to the right curve. If the right boundary is
and the left boundary is
then the length of the horizontal slice is
So the area is
This is the horizontal-slice version of the same idea:
So “top minus bottom” is not a universal rule. It is only the rule for vertical slicing.
The deeper principle is:
- vertical slices use and give top minus bottom
- horizontal slices use and give right minus left
The variable of integration should therefore be chosen to make the region easiest to describe. Good integration is not just about calculating correctly; it is also about choosing a slice that makes the geometry simple.
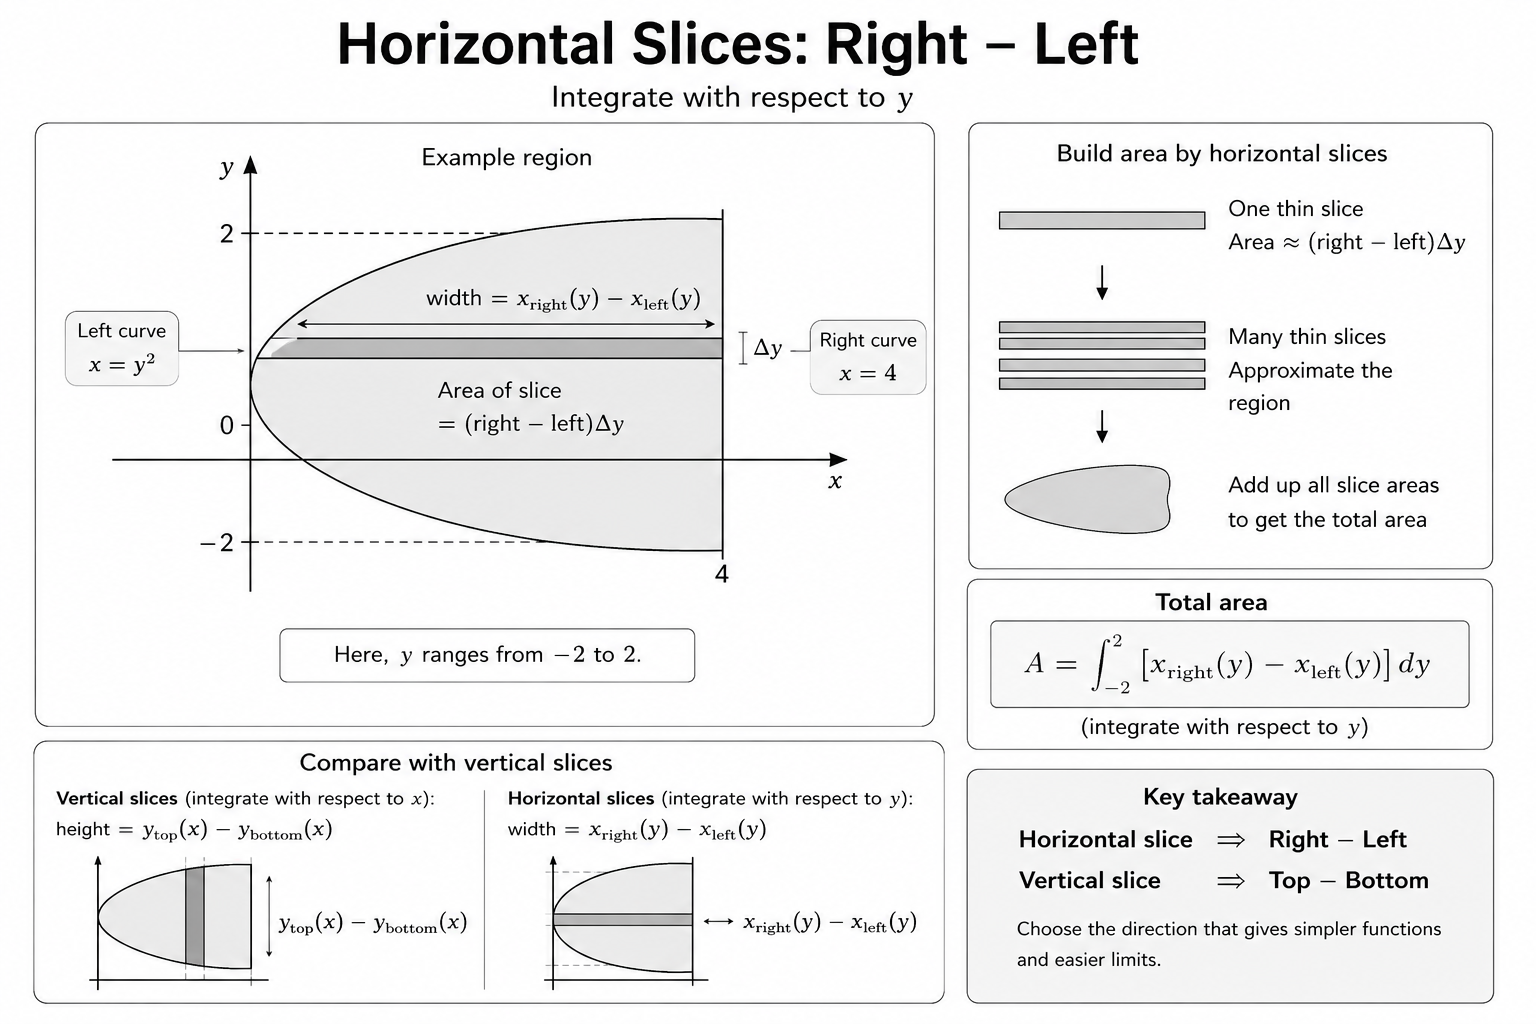 Caption: With horizontal slices, the slice width is right boundary minus left boundary, so the integral is set up with respect to .
Areas Involving Parametric Curves
In some application questions, a curve is not given directly as . Instead, it is given parametrically:
This means that the point on the curve moves according to the parameter . As changes, both the -coordinate and the -coordinate change.
So a parametric curve is not only a shape. It is also a traced path.
This matters in area questions.
For an ordinary curve , the area under the curve from to is
For a parametric curve, is given in terms of , and must also be expressed in terms of . Since
tells us how changes as changes, we write
Therefore,
The bounds must also be written in terms of . If the curve starts at and ends at , then
A simple example
Suppose
for
When ,
When ,
So the parameter tells us that the curve is traced from to .
The area under the curve is
Since
we have
Substituting gives
This example shows the key idea: the parameter gives both the height and the horizontal change .
The formula is not simply “integrate with respect to ”. We must include the factor
This is why the parameter cannot be ignored. It controls:
- where the curve is located
- which part of the curve is traced
- the direction in which the curve is traced
- the correct bounds of integration
For example, two different ranges of may trace different parts of the same curve. Sometimes the same Cartesian equation can be traced more than once, or only partially, depending on the parameter interval.
This is why eliminating the parameter is not always enough. Eliminating may tell us the shape of the curve, but it may lose information about how the curve is traced.
A good approach is therefore:
- understand the parametric curve by checking key values of
- determine the corresponding start and end points
- identify the part of the curve being used
- decide whether the required area is under the curve, between curves, or part of a rotated region
- set up the integral using the correct parameter bounds
So a parametric application problem is usually a curve-interpretation problem first and an integration problem second.
The main question is not just “What formula should I use?” but:
What part of the curve is being traced, and how does that tracing define the region?
Volume of Revolution
Disc idea: rotation about the -axis
When a region under
from to is rotated about the -axis, the solid can be imagined as being made from many thin circular discs.
Each vertical slice has width . When this slice is rotated about the -axis, it forms a thin disc.
The radius of the disc is the distance from the curve to the -axis. Since the curve has height , the radius is
So the cross-sectional area is
Adding all these thin disc volumes gives
The important point is that the formula comes from geometry:
- radius of each disc is
- cross-sectional area is
- integrating adds these thin volumes
Rotation about the -axis
The same idea applies when a region is rotated about the -axis, but the slicing direction changes.
If the region is described by
from to , then it is more natural to use horizontal slices.
A horizontal slice has thickness . When this slice is rotated about the -axis, it forms a thin disc.
The radius of the disc is now the distance from the curve to the -axis. Since the curve has horizontal distance from the -axis, the radius is
So the cross-sectional area is
Adding all these thin disc volumes gives
So the two basic disc formulas are parallel:
For rotation about the -axis,
For rotation about the -axis,
The difference is not just symbolic. It comes from the direction of slicing:
- rotating about the -axis usually uses vertical slices and
- rotating about the -axis usually uses horizontal slices and
A simple example
Consider the line
from to .
If this region between the curve and the -axis is rotated about the -axis, each horizontal slice forms a disc.
At height , the radius is
So the volume is
Therefore,
This is the volume of a cone with height and base radius , which confirms the geometric meaning of the formula.
Why the formula should not be memorised blindly
The symbol
is not the real idea.
The real idea is:
- identify the axis of rotation
- identify the radius as the distance from the slice to that axis
- square the radius because the cross-section is circular
- integrate the resulting cross-sectional area
If the axis changes, the radius changes. If the slicing direction changes, the variable of integration changes.
This is especially important when the region is between two curves. Then the cross-section may be a washer rather than a full disc.
For example, if a region between two curves is rotated about the -axis, the cross-sectional area is
So the volume becomes
Similarly, if the region is rotated about the -axis, the same outer-minus-inner idea applies, but the radii are measured horizontally and the integration is usually with respect to :
So volume of revolution is not mainly about memorising a formula. It is about seeing the rotating slice:
- What shape does the slice make after rotation?
- What is its radius?
- Is there an inner hole?
- Should the slices be vertical or horizontal?
- Should the integral use or ?
Once these geometric questions are clear, the formula follows naturally.
 Caption: The disc method comes from summing the volumes of thin circular slices whose radius is determined by the distance from the curve to the axis of rotation.
A Reliable Application Workflow
For most application questions, the safest approach is to set up the geometry before doing any integration.
A useful workflow is:
- Sketch the graph or region.
- Identify the boundary curves, axes, or axis of rotation.
- Find where the graph changes sign or where curves intersect.
- Decide whether the interval or region must be split into separate parts.
- Choose the slice direction: vertical, horizontal, or rotational.
- Describe the geometric quantity in words first.
- Translate that description into an integral.
- Evaluate the integral only after the setup is justified.
This order matters because many mistakes in integration applications happen before the actual integration begins.
For example, a student may integrate correctly but still get the wrong answer because the wrong region was used, the curves were subtracted in the wrong order, or the axis of rotation was misunderstood.
A good standard for checking your own work is:
- if the setup is wrong, fluent integration will still produce the wrong answer
- if the setup is right, the remaining algebra is usually routine by comparison
So the most important question is not immediately:
Can I integrate this?
It is first:
What geometric quantity am I actually trying to add up?
Common Pitfalls
- Using one integral when the region should be split into two or more parts.
- Treating signed area below the -axis as positive without adjusting the setup.
- Subtracting lower minus upper instead of upper minus lower.
- Using top-minus-bottom when the slices are horizontal and require right-minus-left.
- Guessing intersection points from a calculator when exact values are required.
- Rotating about an axis without identifying the actual radius.
- Forgetting to check whether the cross-section has an inner radius.
- Eliminating a parameter and then forgetting the parameter restriction or traced branch.
- Beginning the integration before the region has been clearly understood.
Link Back to the Main Hub
This note depends directly on integration:
- standard forms and techniques are still needed
- but the dominant difficulty here is usually setup and interpretation
So if a question feels difficult, check whether the real issue is:
- integration method
- or geometry and graph setup
That distinction is often what makes application questions manageable.